
Geared Hub Internal Repair
Updated November 16, 2011
The spindle nut socket can be made from a Dana 44 spindle nut socket like NAPA 2467 (about $30), just grind one of the points off. The Kent-Moore tool for this costs much more.
Does the new style, split spindle nut fit on the older spindles that have the nuts with the fingers on them? I'm about to rebuild the geared hubs on my project truck, and would rather go with the safer solution, but not spend a ton of money replacing a bunch of parts.
The current style nuts will fit on the earlier spindles. In fact, everything is interchangeable on every geared hub. You just need to be aware of what type of spindle you have and steering arm cover to match (CTI and non-CTI). In 99 the gears in the hub were cross-cut for noise, but everything else is the same, bearings, fastners etc.
The k-m numbers for the hub seal drivers are as follows: J-8092, long driver handle. J-42188, short driver handle (good for installing input seal with hub still in-truck. J-35184, output seal adapter (early style seal). J-44905-A, input seal adapter (late style recessed seal).
 Most people don't think about them much since they don't usually fail. And no, I didn't have one fail either (thank goodness for small favors!). But I have had one run hot for some reason, so I took it apart. The first time was in the parking lot of the Best Western in Deadwood, South Dakota after our event this spring. On the way to South Dakota an Interco Super Swamper Radial blew up on the left rear - on the freeway at 70+ mph. But that's another story......
As I was changing tires, I noticed that the hub was warm and much warmer than the rest of the hubs. I thought maybe some bearing damage was done when the tire blew. So I watched it during the event (I always drive conservatively anyway, right?), and opened it up before the ride home. John Ward, one of the AM General Hummer techs helped me inspect it and we found nothing wrong other than some water contamination and a worn input seal. Gee, how did that water get in there? I put in new oil and a new input seal and drove it home to Wisconsin without incident. But I wanted to do a more thorough inspection. So I took it apart after I got home to see how it ticks.
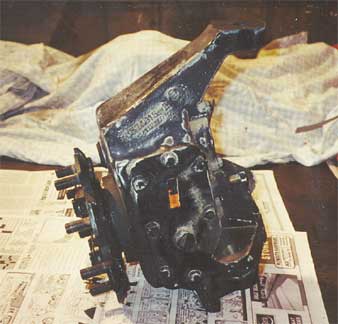
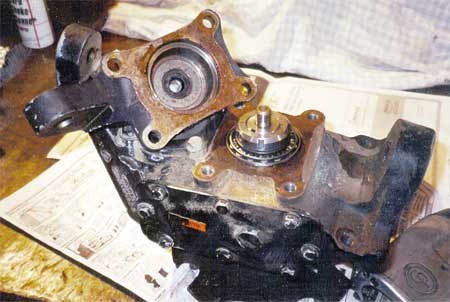
DESCRIPTION:
The hub is pretty simple. It is a single reduction, spur gear, gearbox. The input gear at the top is driven by splines on the outward end of the halfshaft and is supported on roller bearings. The input gear drives the output gear, which is splined to the output shaft that the wheel is bolted to, and also runs on tapered roller bearings. The hub assembly is attached to the suspension a-arms with the upper and lower ball joints, and steering is accomplished by the tie rod attached to the steering arm cover. There are lip seals at the halfshaft input and the output shaft. On Hummers with CTI there is also a lip seal inside the steering arm cover to keep the tire air out of the hub. The hubs are vented to the air cleaner to assure there is no vacuum generated when the hub is submerged in cold water, so there is a connection on the side of the hub for the vent line. A large inspection cover is on the side of the hub and also holds the oil fill connection. The output gear is removed through the inspection cover if necessary. In the pictures, I did not remove the output gear from the hub. Just lazy that day I guess.
WHAT SHOULD BE INSPECTED IN THE HUB?
If you want to inspect the hub, before you take it apart, remove the halfshaft and wheel and tire. Rotate the output shaft and input gear both directions to see if you can feel any rough spots as you rotate. Rough spots in the rotation would indicate a bad bearing or rough gear face.
The seals and seal wear surfaces should be inspected for wear and grooving.
The gears should be inspected for wear by measuring the backlash (movement due to clearance) between the gears. Maximum backlash is supposed to be .018 inch. The gears must be replaced as a set, if necessary.
 The splines on the halfshaft, output shaft and inside the gears should be inspected for damage and wear.
Bearings and races should be inspected for rough spots, pitting or corrosion.
The vent connection should be inspected for water tightness. With the hub fully assembled, you can pressurize the hub to 2 psi with compressed air and use soap and water solution on the seals and cover plates (look for bubbles) to determine if there are any leaks, or you can create a vacuum to see if it will hold. Both pressure or vacuum can be connected at the vent connection. Don't exceed 2 psi or you could damage the seals. If there is a pressure or vacuum leak, water can enter the hub when you drive in water.
Check the 85W-140 Gear Oil. If it is milky, that usually means you have a water leak from a loose vent line or a worn seal.
 Check the output shaft for endplay. Jack up each tire and try to shove it in and out. It should not move. If it does, you need to inspect the output shaft bearings and/or tighten the output shaft adjusting nut. To adjust the output shaft: remove the steering arm cover. Loosen the adjusting nut lock screw. Torque the adjusting nut to 40 foot pounds. Rotate the output shaft 5 times or so. Loosen the adjusting nut and retorque to 25 foot pounds. Use Loctite 272 (red) on the lock screw and tighten it to 90 inch pounds. Use Loctite 518 anaerobic sealer (red gooey stuff) on the steering arm cover and tighten the screws to 65 foot pounds with blue Loctite.
WHAT ELSE CAN GO WRONG?
A number of items can fail in the hub.
1. The most catastrophic is an output spindle break. This is particularly fun because the wheel falls off! Early spindles had a sharp shoulder, which acted as a stress concentration point where cracks can start. I only know of one instance of the output shaft breaking.
2. Probably the most common failure is the shaft seals. Like all seals, eventually they wear out. Sand and mud accelerate the wear. If the outside of the hub is wet with oil, you likely have a seal leak. Seal replacement is not difficult at all. If the input seal fails, all you have to do is remove the halfshaft, pry out the old seal and tap in the new. The manuals call for removal of the upper gear retainer that the seal is pressed into, but removal is not necessary if you pry out the old seal carefully. The retainer is plastic, so don't let the pry tool scratch the seal bore. One main reason not to remove the retainer is that there are shims under it to set the end play of the input gear. If you remove it, you may upset the end play setting. End play is the amount of movement in the gear along the length of the gear. The end play is supposed to be .001 to .006 inches. If you do remove the retainer, use Loctite 518 sparingly to seal and torque the screws to 35 foot pounds with blue Loctite. Polish the seal seat on the half shaft if it is rough. If it is scored deeply, it will just cut up the new seal. There is a seat repair sleeve available from dealers if the seal seat needs repair beyond polishing. Or you can install a new halfshaft.
The output shaft seal (behind the wheel flange) is a little more involved to change, but still not difficult. You need to remove the output shaft. First remove the wheel. Remove the steering arm cover on the back of the hub. Remove the output shaft adjusting nut, inner bearing and spacers. Slide the output shaft out. Keep track of how the parts were assembled, including which side goes out. Pry out the old seal. Installing the new output seal is interesting because it is so big. I highly recommend using the seal installation tool to make sure the seal is installed flat. Tapping it in with a block can result in a wavy seal, which would accelerate wear.
Why You Should Maintain Your Hubs
Two winters ago(2002), going over a pass
in a blizzard (I'm In the mountains of central Idaho) The right front wheel,
spindle and all, came off. The vehicle was pretty good about it as I managed
to get over to the side without blowing out the entire geared hub housing or
becoming lodged in a hillside. It took about 4 hours to get a truck big
enough to drag me away. Believe it or not I was grateful that it happened
when it did as I had just completed a cross country trip and it could have
happened at 8,000 feet in the middle of nowhere.
Turns out the clamp nut holding the spindle had come off. There is a lock
screw that is supposed to hold the nut tight and it should not be under
pressure to loosen as it faces a keyed washer. When I examined the parts I
noted that there was no sign of locktite or any other agent on the lock
screw or clamp nut. During the repair I learned that there are two different
spindle designs. Mine is a 93' wagon and through about 94' they used a
squared shoulder spindle (this is supposedly a weak spot) After 94' they
went to a radiused shoulder. While this may not mean a thing to anyone not
facing the problem I had... There is a rub when you convert to the newer
spindle design... It requires a special adapter spacer to fit the changed
dimensions. All in all the repair took about three weeks because of the
spacer and differences in current parts. AMG part numbers did not
distinguish between old and new designs or identify the need for the spacer.
Needless to say I now check all of the wheels at every scheduled maint. I thoroughly checked them after the repair. Pulled the steering arm cover (I think that is what they are called), removed the lock screw and gave it the locktite treatment.
Another Story
I was driving to dinner Friday night in our 1993 Hummer with my wife, our 2 friends, and our 10 month old daughter. As we were approaching a very busy intersection in Merrillville, IN, the right rear A arm slammed to the ground and we went skidding through the intersection with a HUGE shower of sparks following behind us. Thankfully I was only going about 40 miles an hour so I was able to pull to the median without any problems. However, the person in the turning lane was not so lucky. A woman who was waiting to merge into traffic on US30 was watching my fireworks display and never saw the rolling 180 pound tire until it burried itself into her rear door. She was more scared and shocked than anything else and her car was quite a wreck. Her entire door was shoved in and thankfully no one was hurt in her car our ours. It seems that the spindle in the geared hub came loose of the main nut and the whole assembly slid off with the wheel/tire and all. I guess looking back, this could have been a whole lot worse than it was seeing that traffic is usually VERY heavy right there at I-65 and US 30 but for some reason this is the only thing that happened. Then again, maybe it was pretty busy until I lit up the pavement with the A-arm. Everyone probably backed off and let things come to a stop before proceeding. Who knows, but I'm happy it wasn't worse. So...
I am hoping that this isn't a common ocurrance for the older trucks. I had heard of a MILITARY HMMWV geared hub warning/bullitin pertaining to this exact thing. I guess the washer was too thin and they were needing to be replaced due to this kind of failure. Seeing that our older rigs (1992-93) are using almost all the same stuff from the military, I'm wondering if this might have been overlooked somewhere down the line.
The facts are as follows...
* 1993 Hummer w/CTIS
* 40,000 miles
* Purchased, serviced, and maintained by Great Lakes Hummer (love those
guys up there)
* Aux. vehicle for my wife and daughter (hardly driven / twice a week maybe)
* No warning signs other than a quick loss of air pressure and very loud
thud when it hit the pavement
* NO seals have been repaired/replaced on the rear hubs
I absolutly love this truck and it's been virtually break down free for the past 2 years until now. I'm having all the hubs checked so that this doesn't happen to my wife anytime in the future seeing that this is her main vehicle in the winter. I'm trusting her life as well as my new child's life in the care of a AM General product and I'm not taking any chances.
