
Replace Your Monsoon Radio Head Unit
© Copyright 2000 - 2006 Chuck Kopelson 04/19/2004
Updated
February 3, 2014
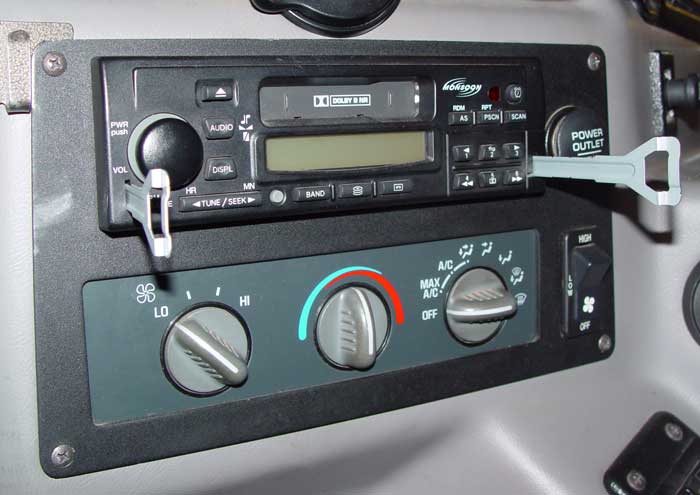
Hummer factory Monsoon system:
- Monsoon head unit with integrated tape and Clock
- Delco CD Changer in the dog house
- Monsoon amp
- Monsoon Sub
- Monsoon speakers (6 of them)
I really like the sound of my Monsoon stereo. Since my truck a 1998 was built many years ago HD digital radio, satellite radio (Sirrus and XM), MP3/ WMA cd's , Ipod music players and USB drives have been introduced. If you want this new technology you have to replace the GM Monsoon head. This lets you keep the existing Monsoon amp, speakers and subwoofer (under the rear seat). Be aware that when you change the head unit you will no longer be able to use the factory Monsoon CD changer built into your dash. Of course this isn't much of a problem because you can record 300 mp3 tunes on one CD or listen to 1000's of songs on an Ipod or flash drive. The head unit that I ordered is a Sony CDX-GT610UI. As of October 2007 it's the only receiver at this time that has a USB port right on the front panel. Your biggest problem is going to be what to do with the space that houses the CD changer. If you add satellite radio like XM you will need to purchase and install another antenna.
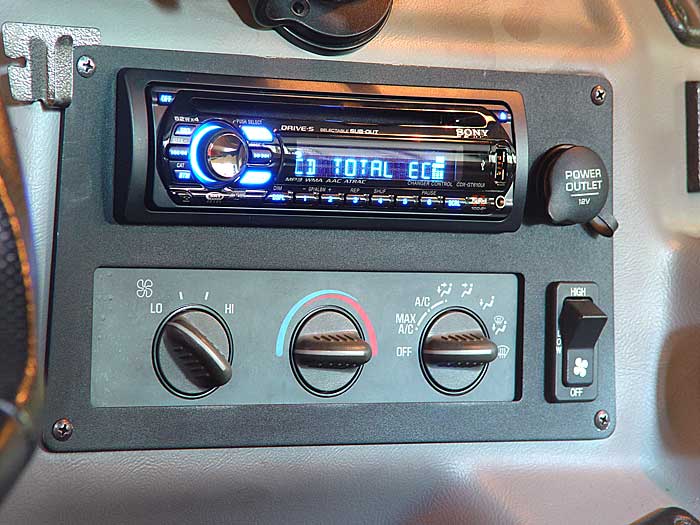
Sony CDX-GT610UI
The trick is to find a new head unit that fits in the dash and a way to wire it into the Monsoon system's power amp. I measured the head unit. It's 6-1/2 deep, 2" tall and 7" wide. According to Crutchfield the the radio is a size code E which is a "Euro-DIN" stereo that attaches from the front through a 2" tall rectangular hole in the dash, sliding into a metal sleeve that attaches to the front of the dash. This is probably the most generic size you could ever want. I installed a Sony CDX-GT610UI CD/MP3/USB Receiver.
Aside from the new radio, it costs about $40 for the two connectors to make it happen. Some head units don't have metro connectors. With these all you have to do is splice the wires between the connector that comes with the head and a metro connector that plugs into the truck. You simply wire up 4 pairs of speakers, a ground, a power wire and a switched (ign) power.
On pre 2000 trucks the Monsoon head uses a standard GM radio connector. On later models (2000) they use a standard VW/ DIN connector (part no. 70-1784). The Monsoon power amp is setup to take speaker level inputs so you can feed it using the output from almost any head unit whether it has line outputs or not. The Monsoon power amp automatically turns on when it senses audio input so you don't have to worry about turning it on. '99 and newer Monsoons have auxiliary inputs on the back of the stereo. You'll need to splice into the correct wires to use them.
I purchased the Metra part # is 80 -1858 (GM 1988 - 2005) 21 pin Smart Cable for $20.
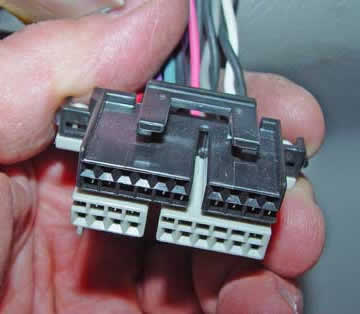

Metra converts the factory connector pictured on the left, to a universal connector so all you have to do is buy a Metra connector (pictured right) for the new radio you want to install. In essence, the Metra becomes a common denominator. All you have to do is get the Metra smart cable for the radio you are installing and plug it in. In my case it was a Sony head unit so I purchased Metra part # SY16-80A. I was told by a couple of installers that each radio company; Sony, Pioneer, Alpine ... have their own unique connectors. Evidently Sony has 2 styles of connectors. I bought the 16 pin which should be good to connect my Sony head to the truck.
 If you can't find the correct Metra connector for your radio use the pigtail ended plug that came packaged with your head unit and splice it to a Metra 70 -1858 pictured on the left which is the same as the 80-1858 except it doesn't have the universal connector. While I can't guarentee it, the wire colors are pretty standard so all you have to do is match colors. Of course you could always splice the radio connector directly to the harness in the truck but I don't believe in cutting into the wiring harness in a vehicle.
Wire Color Codes for Monsoon Head Unit (98 Hummer) |
|
| Red (ign) | Power - 12 volt switched with key |
| Grey | Memory - 12 volt constant |
| Black | Ground |
| Pink | Amp Sense (remote turn on) |
| Lt Blue | Illumination |
| Purple | Dimmer |
| Green | Left Rear + |
| Black | Left Rear - |
| White | Left front + |
| Black | Left front - |
| Gray | Right Front + |
| Black | Right Front - |
| Purple | Right Rear + |
| Black | Right Rear - |
Wire Color Codes for Aftermarket Stereos |
|
| Red | Power - 12 volt switched with key |
| Yellow | Memory - 12 volt constant |
| Black | Ground |
| Blue | Power antenna or Amp remote turn on |
| Orange | Illumination |
| Green | Left Rear + |
| Green / Black | Left Rear - |
| White | Left front + |
| White / Black | Left front - |
| Gray | Right Front + |
| Gray / Black | Right Front - |
| Purple | Right Rear + |
| Purple / Black | Right Rear - |
While it may be possible to find a way to use the factory Delco CD Changer with an aftermarket head unit; in my experience proper CD changer operation is generally achieved only by using a CD changer designed specifically for the head unit you are using. With new players like the Sony there's no reason to need a cd changer because you can fit 100's of songs on one CD or USB drive.
The antenna connection on the Monsoon head unit is a standard sized connector so you don't need an antenna adapter for a new head unit like with most GM's. On the newer Monsoon there are two plugs I did not use. One seems to be for the Monsoon CD changer and the other is for the Rear Seat Audio Unit
 This set of directions shows you how to install a new CD player, XM radio and a new head unit. In my case I only replaced the head unit so I didn't need to go through all the steps.
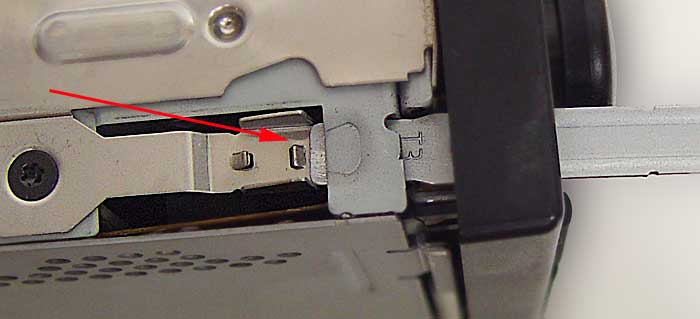
Security Removal Clip Position on the Monsoon Unit

Remove the Din Sleeve
- Remove the factory Monsoon head unit.
- Make sure there are no CD's in the cd changer or a tape in the head unit. or you will not be able to remove them once the Monsoon head unit is disconnected.
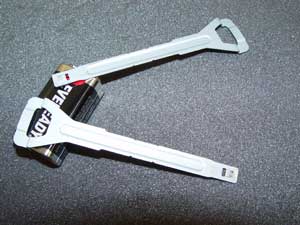
- Insert two security removal tools into the two vertical slots on the Monsoon head unit. You don't have to insert them far. Just enough to engage the clip on the radio. See the above picture.
- With removal tools in place pull out a bit on the tools, grab the head unit around the outside bezel or by inserting your fingers into the tape door and pull the head unit out of the slot .The head unit will come out far enough to access it's rear.
- Carefully pull the antenna connection out of the right rear of the unit.
- Squeeze the release tab on the small connector for the CD changer attached to the pigtail coming out of the center rear of the unit and pull it out.
- Squeeze the release tab on the large connector on the left rear of the unit and pull it out. The radio is now free.
- This would be a good point to skip to step 12 and temporarily connect the new head unit to make sure that it works as expected. If so, disconnect and proceed.
- Remove the 4 phillips screws holding the front panel to the dash and pull it out.

- Bend the mounting tabs on the original head unit mounting sleeve up into the sleeve and remove it. Most new radios come with their own new DIN sleeve.
- If you do not have the right security removal tools you can very easily make them. Find any thin stiff material and cut it so that it is 3/4 of the width of the vertical slots on the front of the Monsoon head unit. Make sure you cut it to be at least 4 inches long. You will need to make two. Just insert them into the vertical slots. Once you feel resistance they only need to go in another 1/4 of an inch at most. Do not force anything, only a very small amount of force is required to release the security tabs.
- Remove the factory Delco CD Changer. (optional)
- Unscrew the four screws that hold the cd changer trim plate to the dog house and remove the trim plate
- Unscrew the four screws that hold the cd changer in place and slide it out of the slot
- With the cd changer out far enough to access the back side of it you can disconnect the single attached cable
- With the cable disconnected, the cd changer is fully removed and can be set aside
- Remove the factory cd changer cable.
- Gently pull the cd changer cable out of the cd changer slot in the dog house and set it aside
- Remove the glove box (optional)
- Remove the cupholder tray from the dog house
- Open the glove box and remove the four screws securing it to the dog house
- Slide the glove box out and set it aside
- Remove the driver's kick panel (optional)
- Remove the kick panel by the driver's feet to expose the steering column and the wiring under the dash.
- Mount the new CD Changer (optional)
- Remove the four bolts holding the right front passenger seat to the floor of the truck and remove the seat
- Turn the seat upside down on a stable work surface
- Attach the mounting brackets to the cd changer and place the assembly within the exposed frame of the seat. Carefully locate the assembly in the desired final mounting location and then mark the holes you need to drill on the seat frame
- With the seat securely held drill the four holes
- Mount the CD changer in the seat frame using the new holes
- With the seat out of the truck, route the CD changer cables (RCA and Bus) underneath of the trim next to the seat location in the truck and up into the dog house to the planned installation location of the XM tuner (behind the glove box)
- Reinstall the seat in the truck, taking care not to pinch the newly installed cables
- Connect the CD changer to the cables
- Mount the XM Antenna (optional)
- Place the XM antenna on a clean metal surface on the exterior of the vehicle. In my case, I placed it on top of the light bar which has a flat metal screen. It is possible to mount it under the hood since the hood is fiberglass, but it still needs a metal mounting surface with at least two square feet of surface area.
- If possible, secure the XM antenna so it will not get knocked off by brush and trees. I used zip-ties for mine.
- Route the attached cable into the vehicle. I ran my cable along the light bar support bracket to the hood cut-out by the CTIS pump. I then cut away the rubber seal next to the CTIS pump where the hood release cable goes into the passenger compartment and pushed the antenna wires through there. I then resealed the hole with RTV sealant.
- Run the antenna cable behind the dash and dog house to the planned installation point for the XM tuner (behind the glove box)
- Provide Power for the XM Tuner (optional)
- Wire the supplied power connector for the XM tuner into a switched and fused power source. I tapped into the switched power being supplied to the head unit through the new Metra wiring adapter since it is easy to work on out of the truck. This will turn on the XM tuner anytime the vehicle is on.
- This would be a good point to verify that the XM tuner powers up. Skip to step 11 and temporarily connect the XM tuner to the power wire. Turn the ignition to "ACC" or "On" and verify that the XM tuner powers up. If so, disconnect and continue.
- Route the audio and control cables for the XM Tuner (optional)
- Run the RCA and Bus cables for the XM tuner from the empty head unit slot to the planned XM tuner location (behind the glove box)
- Install the wired remote control (optional)
- Run the wire for the wired remote control from the empty head unit slot to the planned installation location (dash, steering column or trim panel next to driver)
- Securely mount the remote
- Install the XM Tuner (optional)
- Connect the wires for the XM tuner: power, RCA, Bus, Antenna
- Using double backed super-lock velcro mount the XM Tuner to a flat surface behind the glove box (preferably onto the back of the truck's computer or next to it)
- Install the new head unit
- (optional) Take the rear stud ffrom the original Monsoon head unit and screw it into the back of the new head unit. The new head unit should have a threaded hole for this purpose. After the stud is installed, screw the rubber boot over top of the stud. This is not critical. Most radio installers don't use the rear supports. There's a good chance that the rubber boot / stud won't fit in the new radio.
- Install the new mounting sleeve for the new head unit by sliding it into the head unit slot on the dog house and bending the mounting tabs on all sides to securely hold the cage in place.
- The Sony has an Ipod cable hard wired into the rear. I routed the cable and left it loose under the drink holder behind the glove box which will allow me to get to it if i want to hook up an Ipod.
- Screw the front panel back into the dash.
- Plug the Metra GM wiring harness adapter into the old plug hanging out of the head unit slot that was previously connected to the original Monsoon head unit.
- Plug the Metra in this case Sony wiring harness adapter into the back of the new Sony head unit
- Connect the two Metra wiring harness adapters to each other
- Plug the FM radio antenna connector into the back of the new head unit
- Slide the new head unit into the mounting cage until it securely locks in place
- Snap the supplied trim piece into place around the new head unit
- Fully test your system before proceeding. Check the following items:
- Speaker balance and fade
- Radio display dims when the parking lights are turned on
- CD changer is recognized and operates properly
- Xm Tuner is recognized and operates properly
- Wired remote functions properly
- Clean up
- Go back and neatly wrap and secure any loose wires both inside the dog house and out. Make sure nothing will get pinched and there are no wires hanging loose.
- Install the new cover plate for the dog house where the old cd changer used to be
- Install the glove box and cup holder tray
- Replace the driver's kick panel
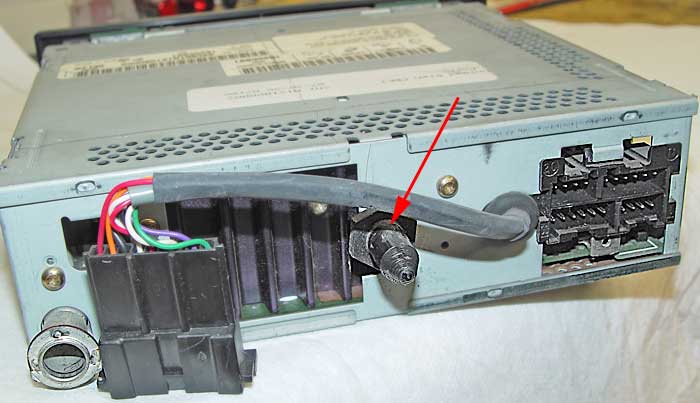
Monsoon Rear showing the support stud. Many new radios do not have the support stud.
Monsoon Error Codes
E20 Focus Error . This could occur if the disc is dirty, in rough roads or
if the humidity is high.
E21 Tracking Error. (Tracking error can be caused by blemishes on the disc)
E22 Motor Error. The CD motor needs service.
E23 Communication Error
E30 Focus Error (Optics focus error may be due to moisture, upside down disc
or empty cart)
E31 Tracking Error ( Tracking error can be caused by blemishes on the disc)
E32 Load / Unload motor Problem.
E33 CD Changer Communication Error.
E34 CD Changer Door Open
E35 Changer Cartridge Empty.
Here's the common solutions for the E3x series of errors
E30 : Focus Error Cause(s): The CD player cannot focus on the disc or there
is an internal focus problem. Correction(s): Try cleaning the disc or using
a new disc. Make sure the disc is loaded correctly. The road could be too
rough or there is too much humidity. If there is still an error, service the
unit at an AC DelcoR Service Center.
E31 : Tracking Error Cause(s): There is a problem with reading the disc.
Correction(s): Try cleaning the disc or try using a new disc. Make sure the
disc is loaded correctly. The road could be too rough or there is too much
humidity. If there is still an error, service the unit at an AC DelcoR
Service Center.
E32 : Motor Error Cause(s): The CD motor is not handling the compact disc
properly or defective magazine mounting screws are interfering with the
mechanism. Correction(s): Reload the magazine. If there is still a problem,
replace the magazine. If the problem continues, back out the mounting
screws. If the condition is corrected, replace the screws with shorter
screws or add washers to the existing screws. If this condition still
exists, service the unit at an ACDelcoR Service Center.
E33 : CD Changer Communication Error Cause(s): There is a vehicle/radio
communication problem or internal radio communication problem.
Correction(s): Disconnect battery voltage to the radio and then reconnect
after a few minutes. If there is still an error, determine if the problem is
with the radio, the harness or the changer. Inspect for correct voltage at
all connectors. If there is still an error, service the unit at an ACDelcoR
Service Center.
E34 : Changer Door Open
E35 : Changer Magazine Empty
Resources
This started out when I was trying to figure out what to do with the open area that housed the cd changer that is no longer needed. There are a lot of options. I built a dash pocket by gutting the Delco CD player and turning it into a dash pocket which is an open slot to throw cd's maps etc. Check the places out below. They have all kinds of stuff like CD holders with spring loaded drawers, some have cup holders, cellphone holders, switches, ipod connectors etc.
Installer.com
Scoche
Autotoys.com
Dashkit Specialties
Crutchfield
