
B&M's ShiftPlus+ Electronic Shift Improver
by Chris Velardi - Updated March 23, 2009
I installed the ShiftPlus primarily for towing and long steep hill climbing in VT. Soft, long shifts create slipping and overheating of the transmission. The Shift Plus is not a cure for a bad transmission, it's just an upgrade to improve it's performance and life. I leave it in level one for every day driving which gives nice clean, quick shifts. Level 2 adds a kick that's a bit too hard for everyday driving , but good for towing.
 The 4L80E transmissions differ from previous automatics in that the valve bodies are electronically controlled by the vehicle’s on board computer (PCM). This electronic control allows specific programming of transmission-shift firmness, shift points, and other characteristics that were previously not possible with purely hydraulic controls.
Here's what B&M says: ShiftPlus simply recalibrates your transmissions hydraulic system electronically. The ShiftPlus shift firmness not only makes driving more fun and pleasurable, but slippage and heat are reduced - extending the life of your transmission! Anyone can install a B&M ShiftPlus in minutes with a few simple hand tools. This new design allows you to improve the transmissions shifting performance without removing the transmission pan or valve body. The B&M ShiftPlus electronically enhances shift quality and is adjustable. A simple flip of the switch allows the transmission to operate in the performance mode. Flip it back and you are back to stock!
 The B&M unit #70380 ShiftPlus for GM '93-'98 4 wheel drive vehicles is the one used for the Hummers 4L80E transmission. The ShiftPlus costs around 50.00 (2005). This kit is NOT suitable for 92-93 Hummers because they don't use the 4L80e transmission. It also is not for a Duramax Alpha which uses an Allison transmission.
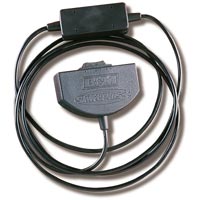
This product consists of a cable and a switch.
 Installation is
straight forward and easy. First find a place to locate the 3 position
switch and route the wire down behind the dog house. Then locate
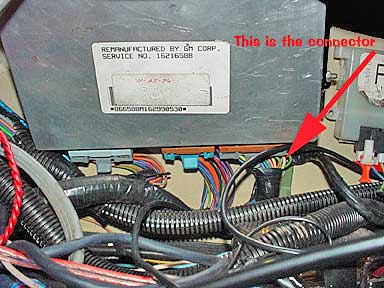
your PCM inside the dog house (aluminum box attached to the engine cover
with 3 large multi pin plugs coming out the bottom).
Installation is
straight forward and easy. First find a place to locate the 3 position
switch and route the wire down behind the dog house. Then locate
your PCM inside the dog house (aluminum box attached to the engine cover
with 3 large multi pin plugs coming out the bottom).
The directions are specific for 1996-1998 C/K Truck (6.5L Diesel) not an H1 Hummer so some research had to be done to find out which pins and wire colors to use.
 There are three multi pin connectors coming out the bottom of the PCM. The one pictured on the right is the one you need to splice into. It is a 32 pin connector and it is brown.
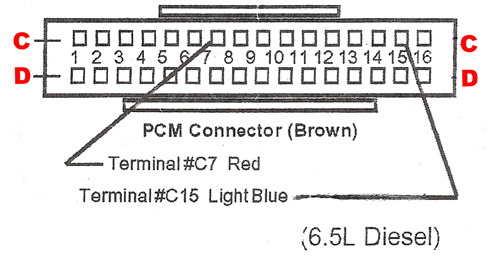
The following is a list of all the wire colors for the connector. There are two rows of pins. One is the "C" side and one is the "D" side. The colors and pins are as follows:
Side "C" (the side we want)
1- purple
2 - yellow
3 - nothing
4 - tan
5 - light blue
6 - yellow
7 - RED (this is the C7 that will be spliced with the B&M red wire)
8 - brown
10 - nothing
11 - yellow
12 - nothing
13 - red
14 - light green
15 - LIGHT BLUE (this is the one that will be spliced to the B&M black wire)
16 - nothing
On the flip side of the connector (side "D")
1 - dark blue
2 - dark blue
3 - yellow
4 - dark green
5 - gray
6 - gray
7 - light blue
8 - dark green
9 - pink
10 - light green
11 - gray
12 - white
13 - gray
14 - gray
15 - nothing
16 - nothing
B&M's installation instructions and diagrams show C7 as a red wire w/ black stripe and C15 as a light blue w/ white stripe. AMG eliminated the the stripes in the Hummers wiring harness so you will be looking for solid red and solid light blue color wires at the C7 and C15 pins. If you need reference remember that pin #C7 is seven spots from the end and #C15 will be next to the last.
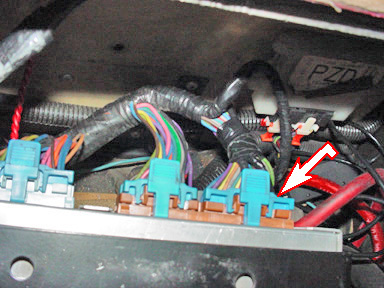
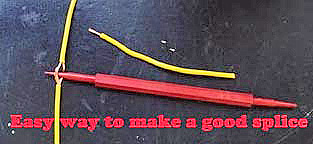 Once you find the pin C7 red wire and C15 light blue wire, cut and
remove a 1/2" of insulation from each a few inches away from the
connector. Push a fine pointed instrument similar to a tooth pick dead
center of the bare wires separating the fine copper strands into two
separate groups. Strip 1/2 " of insulation off the end of the new B&M's
black wire and twist it in your fingers to get a good firm group of copper
strands (with no stragglers) and feed the wire through the center of gap
you just made through the light blue wires. See photo of yellow wire
example of "easy way to splice" Now twist the striped black wire around
the outside of the light blue wire and solder it. Do the same thing for the red to red wires.
Once you find the pin C7 red wire and C15 light blue wire, cut and
remove a 1/2" of insulation from each a few inches away from the
connector. Push a fine pointed instrument similar to a tooth pick dead
center of the bare wires separating the fine copper strands into two
separate groups. Strip 1/2 " of insulation off the end of the new B&M's
black wire and twist it in your fingers to get a good firm group of copper
strands (with no stragglers) and feed the wire through the center of gap
you just made through the light blue wires. See photo of yellow wire
example of "easy way to splice" Now twist the striped black wire around
the outside of the light blue wire and solder it. Do the same thing for the red to red wires.
 After the wires cool wrap them well with black electrical tape and plug
the connector into the PCM. You can now
change the shifting characteristics of the 4L80E any time you want. (no
need to shut the rig off to change settings) So if you are driving along
with a heavy load in level 1 and you come up to a steep hill, all you
need to do is flip the switch to level 2 and climb away. If your taking
the in laws to dinner some night and you want the transmission to shift
soft and seamlessly just switch back to the factory setting.
The B&M Shift Plus kit comes with "Scotchloc" connectors, but I
personally do not like using them if you can solder them you'll get a
better connection.
After the wires cool wrap them well with black electrical tape and plug
the connector into the PCM. You can now
change the shifting characteristics of the 4L80E any time you want. (no
need to shut the rig off to change settings) So if you are driving along
with a heavy load in level 1 and you come up to a steep hill, all you
need to do is flip the switch to level 2 and climb away. If your taking
the in laws to dinner some night and you want the transmission to shift
soft and seamlessly just switch back to the factory setting.
The B&M Shift Plus kit comes with "Scotchloc" connectors, but I
personally do not like using them if you can solder them you'll get a
better connection.
It turns out that the B&M Shift Plus is nothing more then a couple of resistors used to fool the transmission sensor into slightly changing the shift pattern.
Resistance measured:
Center position (off) - Infinite (open)
Position 1 - 26.7 ohms
Position 2 - 5.6 ohms
In theory, I could install a 10 watt 5.6 ohm resistor and jumpered the two wires with it, and I would have been set. 2 bucks (at most) plus the labor. But then, I only paid 16 bucks for the B&M.
The way I understand this might work is that it's fooling some sort of pressure sensor inside the transmission. When it's on setting 1 or 2, it fools the sensor into making the transmission think there's less pressure than there really is. When it's off, it allows the PCM to do the work and gets actual pressure readings that are unimpeded.
