Removing a Hummer Differential
Updated November 16, 2011
I got into this project when I decided to install a Detroit locker in the rear of my 98 Hummer wagon. The project ballooned when I discovered that I had to replace my parking brake cables. Since the rear would be apart I also did a rear brake job. This is also a good time to check your whole drive train because you will have a large portion of it apart.
The second time I dug into this was because my front diff was leaking oil from the passenger side output flange. I had a spare diff so I simply swapped them out. This time I rotated the tires and checked the geared hubs and while I was spending a lot of qualtity time under the truck I greased it.
You can do the job with the tires and wheels on the truck or you can jack the truck up, remove the wheels and place jack stands under the frame. When I did the front I removed the wheels because I was rotating the tires and had them off already.
The following tools and supplies will be needed:
- 9/16" (preferable T-handle - Snap-on RTB-18 about 32.00)
- 15mm open end (ratcheting preferable)
- 15mm socket
- 1 1/8" socket
- 15/16" socket
- 5/16" socket
- 3/4" socket
- ½" socket
- Air impact wrench
- Air chisel
- ½" Ratcheting drive
- ¼" Ratcheting Drive
- ½" Torque Wrench capable of reaching 150 ft-lbs
- 3/8" Allen hex wrench
- ½" Breaker Bar
- Thread Locker Red
- Thread Locker Blue
- Brake cleaner spray
- 240 to 400 silicon carbide sandpaper
- 85W-140 Gear Oil (2 qts per diff)
- Teflon Tape
- Drain Bucket
- Permatex Ultra Grey Gasket sealant
- Floor Jack
- Jack stands
- Hammer
- Screwdriver
- Oil Suction Gun
- HMMWV Torque List
Removal:
 First thing to do when attempting to drop a differential is to remove the undercarriage protection. Then drain the gear fluid. The reason you need to drain the fluid is because when you remove the output flange the oil will pour out the sides all over the place. If you're doing the rear remove the parking brake cables from the calipers.
I Stripped my Rear Differential hex head fill plug and tried a GM plug with a square socket as a replacement
which is an exact fit (1/2" x 14). And the square end is harder to strip.
GM Part # 25522466

Remove the cotter pin, pin and 'C' clip from the rear parking brake bracket
 The Half shafts must be removed from the brake caliper and do not need to be removed from the truck. Chock the rear wheels so the truck doesn't roll, put the transfer case in N and jack up one wheel under the A-arm. I use a 15mm socket in an impact gun and undo the bolts one at a time rotating the tire to align the next bolt. Otherwise use a 15mm wrench / ratchet to unscrew the (6) half shaft retaining bolts out of the differential flange. You can pull the half shafts down and rest them on the lower control arm.
The brake calipers and pads on both sides need to come off. Take the 9/16" / 15mm T-handle and remove the upper bolts holding the caliper on. Use any 9/16" for the easy to get to lowers. Carefully lift the  calipers out of the caliper bracket while pulling the old brake pads out. Be Careful that the now loose rotor doesn't fall on you. Put the caliper aside and use a zip-tie or a hanger wire to tie the caliper suspended so you don't strain or damage the brake lines. I like using hanger wire to tie the caliper to the truck's hold down loops on either side.
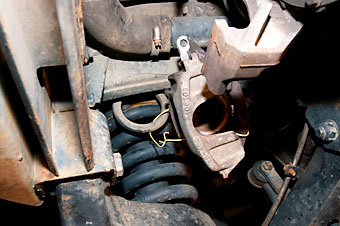
Remove the rotor and brake pads. Inspect them for wear and replace if needed. At a minimum I'd replace the pads because the labor it takes to get this whole thing apart. See my brake article for details on doing this.
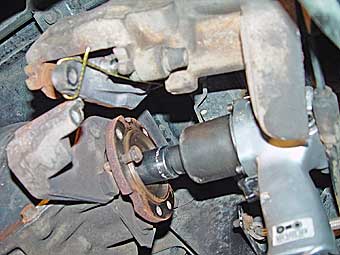 Next, grab your impact and your 1 1/8" socket and remove the output flanges where the half shaft / rotor was mounted. I use a big breaker bar to initially losen the nuts.
One easy way to keep the flanges from rotating is to screw one of the half shaft bolts all the way through the flange so it protrudes out the back side. Rotate the flange so the protruding bolt contacts the caliper bracket bolt. This will keep the flange from rotating while you remove the big bolt. Slide the flanges out of the diff.
Move to the input side of the differential and disconnect the front drive shaft from the diff by taking apart the U joint. When you disconnect the driveshaft you want to make sure that you mark it so it goes back together in the same position because it is balanced. Remove the drive shaft caps with a 5/16" ratchet. Be careful that you don't let the U-joint caps fall off. They are filled with a bunch of needle bearings. If they do get loose (ask me how I know) then you have to retrieve all the bearings or get a new U-joint. Since a new U-joint is only 16.00 bucks I opted to replace it. (how to replace a U-Joint).
When I did this the second time I was careful not to drop the caps. After I had the joint apart I carefully wrapped a piece of duct tape around the cross to keep the caps from falling out. If you lose one of the little bolts you should be able to pickup a strap kit at a good auto parts store.
The other end of the drive shaft is attached to a yoke that is just inserted into the transfercase. The drive shaft should be able to be pushed a bit towards the front of the truck and then drop down away from the diff input yoke. On my 98 the shaft pushed foreword and dropped down to rest between the muffler and fuel tank heat shield. If the shaft won't move out of the way then wait until the differential is loosened up.
If you're doing the front diff remove the front mounting bracket that holds the input side of the diff to the truck. It’s only 2 - 3/4" drive bolts to the frame.

Input side of the rear differential
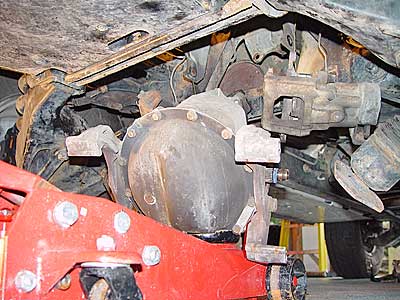 The differential weighs close to 80 lbs. so be careful lifting and moving it around.
There are now 6 bolts left to drop the differential out of the truck. Take the impact or a breaker bar and your 15/16" socket and start to loosen the 2 bolts on either side of the differential. Leave the caliper brackets on at this point. Then loosen the 2 bolts on the input side which are above the input yoke.
Grab your floor jack and raise it up until it is touching the differential. Remove the 6 bolts. Make sure that the brake calipers are tied away from the diff. The diff is heavy and often times is falls off the jack. You don't want it to catch on the caliper and rip the brake line out of the truck..
Lower the jack and the diff should come down. If it doesn't jack it up a bit and then lower it. You may need to use a pry bar to get it to move.
Lower the diff a couple of inches and reach over the top of the and remove the vent line. On my truck it was a 3/8" brass 1/8" NPT barb fitting. You don't want the diff falling out of the truck with the vent line attached. Something is going to give in the venting system leaving you with more things to repair.
Lower the differential all the way down with the floor jack. As it comes down the diff will tilt with the input side raised. Do Not remove the input yoke to remove the diff because its assembly is critical to the pinion gear's alignment within the diff.
Once out of the truck, remove the caliper mounting brackets with a 15/16" socket. After the caliper mounting brackets are removed, remove the differential cover bolts with a ½" socket and service the diff.
Installation:
Install the caliper mounting brackets to the differential using locktite red and torque to 125 to 150 ft lbs. I've worked on a couple of trucks my own included where these bolts loosened up and started to back out. If they back out far enough they can run into moving parts and destroy the brakes. In order to tighten these bolts with the diff in the truck you have to remove the half shaft, the brake caliper and rotor which is a major pain.
With the aid of the floor jack raise the differential into position making sure that it is located between the mounting brackets on either side of the differential with the input yoke tilted up.
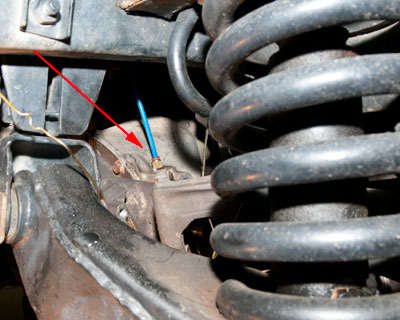 Raise the differential halfway up and reconnect the vent line. I made one stupid mistake that cost me a bunch of time. When I reinstalled the diff I forgot to screw in the fitting for the vent/ breather before I bolted the diff in place. After wrestling with the diff to get it lined up and bolted in, there was no way I was going to drop it back down for one little fitting.
The problem is that you can't leave this hole in the top of the diff uncovered. If you go through water the diff will fill up and get ruined.
AMG uses some pretty tough tubing. I had to heat it with a heat gun to allow it to pull off the stock barbed nipple. Once I got the nipple screwed in I couldn't push the stiff tubing over it working in such a confined space. I screwed around trying to get this thing hooked up for over a week. I finally bit the bullet and took the whole diff out again so I could get it hooked up right. This time I installed a push-lock tubing fitting which will allow me to easily remove the vent the next time.
Raise the diff to its final location and finger start as many bolts as possible. Get all 6 started before you tighten any of them. I had a problem lining up the 2 bolts above the input yoke. I almost stripped out the threads on one. I used a jack and chain to pull the diff down and line up the last 2 bolts. You can see how to do this in my article about straightening your bent undercarriage protection. Using thread locker blue, torque all of the bolts down to 125-150 ft-lbs.
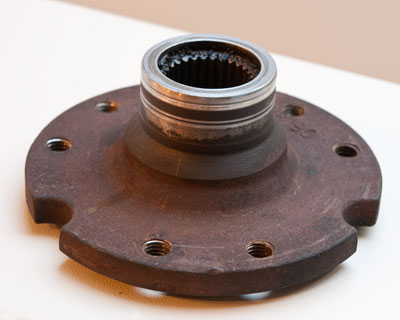 Polish up the sealing surface of the output flange with some 240 to 400 black silicon carbide sand paper. This is the same paper you use to wet sand body work. You're not going to get the grooves out but anything you can do to make this surface smooth will help save the differential output shaft seals. If you have a lathe you could turn the surface down but you risk taking too much material off which would keep the seal from contacting the surface.
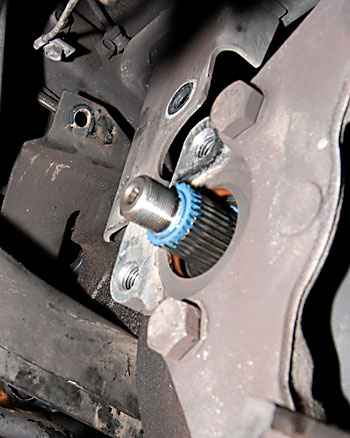 Install the output flanges and the blue or orange oil seal washers. These washers have splines that have to match up with the splines on the shaft and the splines on the flange. If you don't match them up the washer will simply get squeezed to death and not work as a seal.
I like to coat the flange sealing surface with grease. When installing the retaining nut apply a bead of Permatex Ultra Grey gasket sealer around the lip, use some locktite blue on the threads. Use your impact wrench to torque it down. I also used a 3/4 breaker bar to tighten up these nuts. The book says to torque it to 166 to 196 lb ft.
 Re-install the brake rotors and half-shafts.
Get a short thick pin punch to use as an alignment tool. Put the rotor up on the output flange and line up the holes by sticking the punch through both. While holding the rotor in place muscle the halfshaft up in position by pulling it back and pushing it up.
I had the truck up on 2 jackstands under the front of the frame. This lets the a arms drop all the way down. When I was reinstalling the rotor and half shafts I couldn’t pull the left side half shaft back enough to get the rotor in and aligned. I found that jacking up the A arm gave me more slack.
Whenever you reuse bolts you should clean off the grease and dirt in the threads with the brake cleaner and wipe them off so the thread locker will work.
Line the halfshaft holes up with the rotor and Install the half shaft bolts with new nordlock washers. Using thread locker blue, torque the bolts down to 57 ft-lbs. New bolts come with thread locker already on them.
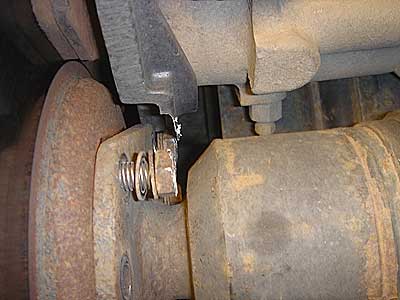
 Once again you don't want the half shaft bolts to back out and mangle the brakes. The picture on the left shows the beginning stages.
Assemble the brakes. Insert pads and calipers. Using thread locker blue and torque the 9/16" bolts to 40 ft-lbs. Be sure to seat the calipers in the proper orientation on the bracket or the bolt holes will not line up. If you removed the parking brake cables connect them up. Reach up and make sure that the steel brake lines are not touching the frame. If they are bend them away or they will rub a hole in the line. Clean all the grease off the rotors with some brake cleaner solvent.
Reconnect the rear drive shaft to the differential. Line up the U joint and place the bearing caps over the ends of the U-joint. Guide the assembly into the differential yoke. Place the drive shaft retaining caps over the bearings and tighten them into place. Grease the joint.
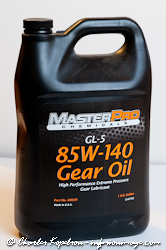
 Make sure the drain plug is tight and sealed. Fill the differential up with 2 quarts of 85W-140 gear oil until the fluid is level at the bottom of the fill hole. I like to use an oil suction gun which is like a big syringe to fill the diff. I picked up this one at Harbor Freight for 5 bucks. I also use it for filling my transfercase oil. Getting oil into the fill plug which is located up high is a messy job at best. Normally when you pull the handle back you can get ½ quart. I was lucky to get half that much. The oil is really thick and I had a mess all over the place.

