
Idler Arm and Pitman Arm Replacement
Updated March 6, 2010
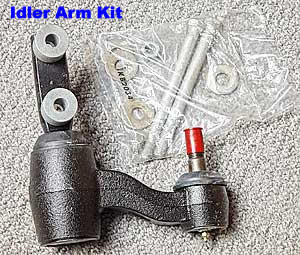

Checking Your Idler and Pitman
To check the idler, jack the truck up under the lower control arm on the passenger side. Grab the tire at the 3 O'clock and 9 O'clock position and try to move the tire in and out. According to the shop manual if you have more then 5/16" vertical motion at the center link or 1/32 free play at the ball stud it needs replacing.
To check the pitman, jack the truck up under the lower control arm on the drivers side. Grab the tire at the 3 O'clock and 9 O'clock position and try to move the tire in and out. According to the shop manual if you have more then 1/8" vertical motion at the center link or 1/32 free play at the ball stud it needs replacing. There's a good chance if your idler is shot your pitman is to.


Next remove the 2 bolts that fasten the idler arm to the frame. In my case there was an 11/16 nut and a 5/8 bolt. Now comes the fun part.
Separating the idler arm and the centerlink is a real pain. My pitman puller didn't fit on the idler so I tried a pickle fork. Then I tried an air chisel. Then I realized that the rubber grease seal was absorbing all the shock. I pried the rubber out of the joint with a razor knife and ended up pounding it apart with a pickle fork. It was a real pain in the butt because the pickle fork I used was too small.
I've since trimmed some metal off of the inside of my pitman puller and use it to remove the idler.
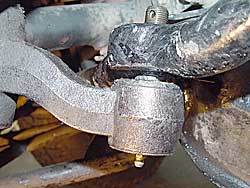
If you're going to replace the pitman arm do it now before you reinstall the idler. With the idler removed the center link will drop down allowing you to pull the pitman arm out. Once you do it you will see what I mean.


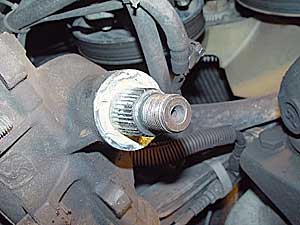
Take a rag and wipe the junk away from the steering shaft and the centerlink hole. Take a good glob of grease and pack it up all around where the steering shaft sticks out of the steering box. This will help seal the steering box from the elements.

Look at the inside splines on the pitman. You will notice that there are 4 flat spots that match up with the splines on the steering box.
Install the pitman on the steering shaft making sure to line up the splines and at the same time insert the tapered bolt in the centerlink. Put the split lock washer and hand start the big nut on the steering shaft and tighten it to 180 ft lbs.Notice that there is space between the top of the pitman and the steering gear.
Install the 15/16" nut on the pitman bolt and tighten it to 80 ft lbs making sure that while you are turning the nut you line up the cotter pin hole. Always tighten to align the holes. Install the new cotter pin and grease the pitman.
Now go back and finish installing the the idler arm. Prepare a new cotter pin to match the one you removed. Place the idler arm's bolt in the centerlink. Insert the new bolts through the frame making sure to put the new washers under the bolt heads. Position the idler arm so the frame bolts slide through the bolt holes. Install the washers and the nuts. Torque to 60 ft lbs. Install the 15/16" nut on the idler arm centerlink bolt. Tighten to 80 ft lbs taking care to line up the cotter pin holes. Always tighten to align the holes. Install the new cotter pin, grease the arm and you are finished.
The idler and pitman arms are the links that connect your steering box to the center link which in turn rotates the hubs on the A arms causing the truck to turn. The idler arm simply supports the other side of the center link. If there is free play in any of these parts your steering will be sloppy. Hummers up through 2004 are know to go through these parts often. They last maybe 20,000 miles on a truck that doesn't go off road. I've seen new ones fail after a day or two rock crawling in Moab Utah. Both parts have a bolt that is imbedded in rubber which allows the steering linkage to flex under varying conditions. I believe that it is the rubber and the bushing that is between the bolt and the rubber that wears out. These parts have gone through many design changes over the years and are infinitely better then the originals.
Note: Early trucks 93 - 94 (and most hmmwv's) originally came with a 7/8 in. center link which need a spacer (washers) if installing the latest idler and pitman's so the cotter pin which secures the slotted nut will line up. AMG upgraded the centerlink in 1995 starting at VIN 163985 to 1" diameter. Old idler's and pitman's will NOT work with the newer centerlinks.
If your steering wheel is not centered or loose meaning you can turn your steering wheel left and right an inch or two or three without the front wheels turning you probably are ready for a new pitman arm also known as a steering arm. If you're off roading you will see that the front tires will not stay parallel when going over obstacles; one wheel or the other will tend to splay out. With a very bad idler, as soon as the truck hits 35 mph the front would shimmy and shake like it was coming apart. It stops shaking at around 40. When the weather gets really cold (5 degrees) the problem diminishes because the rubber in the idler arm stiffens up and holds the front end together. As soon as it warms back up to 25 or 30 the shake will return. AMG has gone through a number of revisions of the idler and pitman arms. The latest ones came out in 2003 and have " Moog Problem Solver" stamped on them.
Parts and Tools Needed
- 18mm - 1/2 drive wrench and socket
- Pitman arm puller
- 1-5/16 - 3/4 drive (big) Socket and breaker bar to remove pitman nut
- 5/16 - 1/2 drive Socket and a long breaker bar / pipe
- 11/16 and 5/8 - 1/2 drive socket and wrench to remove older idler arm
- Torque wrench that goes to 180 ft lbs
- Diag wire cutter, flat screw driver and long nose pliers for cotter pins
- Jack stands and a floor jack
- Grease
- 2 Cotter pins 1/8 x 1-1/2
- Idler #5745558 is $142.11 as of 11/1/2005
- Pitman #6011300 is $64.10 as of 11/1/2005
Idler Arm Install:
The idler comes with some new thicker bolts, washers and nuts which turned out to be 18mm metric. The new bolts are stamped on the head "LE 10-19" which I've been told is stronger then a grade 8 bolt. I had a problem. My older Craftsman metric socket and wrench sets didn't have 18mm.
 I did this lying on the floor of my garage. This is one of those jobs that would be nice to have a lift for. Jack up the truck under the right A-arm and remove the right wheel. Put a 6 ton jack stand under the frame and let the truck down on the stand. I also leave the floor jack under the A-arm as a precaution. You don't want the truck to fall on you.
Remove the cotter pin from the nut on the idler. Take a 15/16 socket and a long breaker bar and remove the nut. I put a long piece of pipe on the breaker bar to get the nut loose.
Pitman Arm Install:
Jack the left side of the truck up under the A-arm and put a jack stand under the frame on the left side. Lower the truck down on the jack stand and remove the wheel.
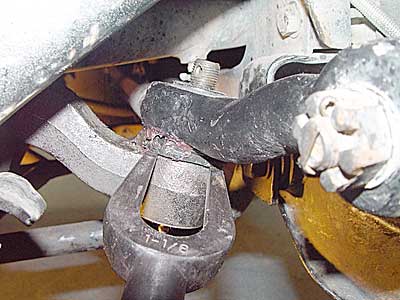
You have to remove the big nut that holds the pitman arm to the steering box. This is a 1-5/16 nut that should be torqued to 180 ft lbs. I used a 3/4" drive socket and a big mother breaker bar. I was all ready for a battle and it turned out that the nut was hardly tight at all. It came right off which was not a good thing.
Take your pitman arm puller and remove the arm from the steering shaft. It will release from the shaft and drop down some but the arm is still being held up by the centerlink.
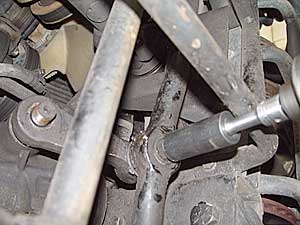 Next remove the cotter pin and the 15/16" nut that holds the pitman to the center link. Use a pickle fork or a puller to separate the pitman from the centerlink. You should be able to remove the pitman by pulling down on the centerlink and slipping it out.
This is where you will appreciate the fact that you have not installed the idler arm yet. If you can't get the pitman arm out drop the idler arm down by removing the 2 bolts that attach it to the frame.
 Put some antisieze grease on the steering box's tapered bolt. Pack grease up into the steering box around the top of the tapered bolt. This will help keep out dirt and moisture.
Prepare a new cotter pin by cutting down the length of one side to match the one you removed.

