Rebuilding a Halfshaft
Upgrading to a 12.1K Halfshaft
Updated December 19, 2008

 There are 5 pieces included in the "boot kit" . 1 boot, 2 clamps, 1 shaft clip, and grease. You need 2 boot kits if you do the whole shaft, or don't want to disassemble the outer cv joint, and you are doing that boot. They are pretty cheap little kits... so I bought 2 or 3 anyway. There is a difference between the boots and clamps as I recall.
There are pictures of rebuilting both the inner and outer CV joint. The 2 joints are very different when it comes to taking them apart and putting back together. If I were to replace my outer cv boot again, I would disassemble the inner joint to replace the boot and not disassemble the whole thing.
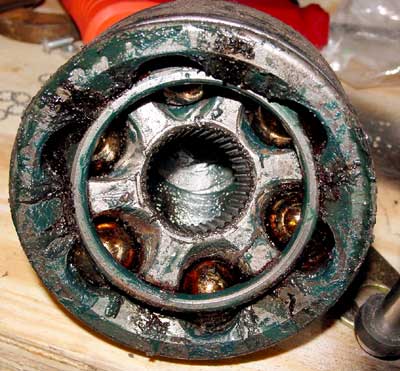
As you can see from the pictures... the grease can be a mess, so have lots of rags.
Also, someone asked me about these "crimpers" for for boot clamps. The last 2 pictures show how the "crimp" works. I think I found my crimpers at Autozone or Pep boys. As I recall they were just called "CV Boot Crimpers" or something like that. The crimpers were in the specialty tool section.
I would also recommend getting retaining ring pliers (when you squeeze the pliers the end opens the ring up).

This is the construction of a half shaft. You have the shaft with splines on both ends.

 On each end you have a "star" shape of metal. This star goes over the shaft splines, and is held to the shaft by 2 retaining rings each. One is on the very end which I call the "shaft clip". Its simply a springy piece of metal that expands in a notch on the shaft to hold the star on. This should be replaced of you rebuild the halfshaft
 The second retaining ring is on the other side of the star to prevent the star from sliding toward the middle of the shaft. This is reusable, and must be moved/removed with retaining ring pliers.
 The "star" and cv housing fit together so that there are slots for 6 large ball bearings. These ball bearings are what "connect" the shaft to the housing. The star and housing kind of float, and the ball bearings lock them together so they don't spin against each other.
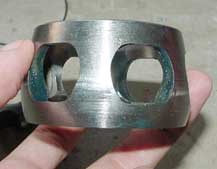
 In between the star and housing, there is a metal "cage" which has holes for the ball bearings. This cage holds the ball bearings in place. This is the part that almost always fails.
 On the inner cv side, there is a ring that fits on the inner diameter of the housing which prevents the shaft end/star from coming out of the housing.
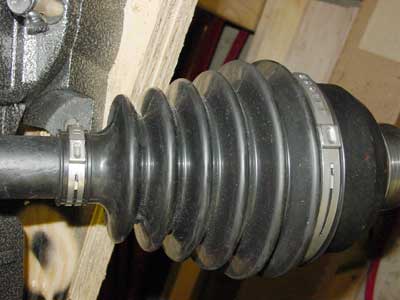
 And lastly, there are the rubber boots, which hold in the grease. These are clamped on with 2 metal clamps per boot.
Leaking Hub Input Seal:
When I took the half shaft out and looked at the seal race it was severely warn, there were deep grooves where the seal touched the shaft. I put in a new seal and reassembled it and so far no leaks but I am not going to hold my breath. Is there any fix
You can resurface a lightly worn seal race in a lathe. For more heavily worn seal races, use a Speedi-sleeve, #99199. These are available or at least can be ordered from most bearing supply stores. Be sure to follow the directions that come with the sleeve exactly as stated.
Halfshaft Replacement Parts:
All parts for the half shafts are available through Rockford. The outer cv joint boot, Rockford DuraBoot 8l5-21L,. Inner boot Rockford DuraBoot 440-20, Cage 178-0, Race 178-018, Balls 714-61.
If you cross ref these parts on the Rockford site they are for a 1993-1998 Mercury Villager, ford Explorer and possibly a Nissan Quest. What this means is that you can buy a CV joint for one of these cars and use the parts to repair your halfshaft.
Another owner reports that the CV Joint boot kit for the inner and outer boot is a Rockford 178-21C
I have used the Rockford boots. They are an exact replacement and in my experience are more durable than the originals. Most any drive shaft and cv repair facility should be able to get these parts for you. They are standard stock items.
The local price for these in kit form, which consists of boot, two clamps, and grease is less than $l0.00. The local shop will replace the boots for $25.00 parts and labor. If the cage, race and balls also need to be replaced, they charge $50.00 for each cv joint.
The above information is for 94 and later.
Tips on Installing Halfshafts
You have to remove the rear parking brake cable to get the right rear halfshaft out. To remove and replace the 6 bolts on the rotor use a 3/8" drive short socket and an extension.
If the halfshaft is broken, you can use a large screw driver or a small (1/4" drive) extension in the edge of the rotor to prevent it from turning.
These are the bolts that hold the halfshaft to the brake rotor. Loctite Red 272 is very hard to remove, and will release with high heat. It is the current AMG recommendation.
Notes: Loctite 271 (liquid - red in color) can be substituted for the pre-applied (dry) Loctite, but I prefer the "high heat/high strength" Loctite 272 (liquid - reddish orange in color) that AMG originally called for when I can find it in a small quantity. Opinions may vary, but when using bolts with pre-applied (dry) Loctite, I find it best to use a torque controlled power tool to quickly run them up to 57 lb.-ft. before the friction & heat that is generated can cure the dry loctite before clamp load is achieved.
Place 2 Nord-Lock lockwashers on each bolt so the inclines are "facing each other" or they will not be effective!!! Clean out any old loctite from the threaded holes in output flanges. The bolt installation torque is 57 lb.-ft.
The current torque setting recommendation for the halfshaft bolts is 57 lb-ft, not the originally recommended 48. If you over torque these bolts you can warp the rotor and ruin it.
For Each Halfshaft
6 - Metric M10-1.5 x 35mm Class 10.9, Phos. coated, pre-applied (dry) Loctite (AMG p/n 6008021) with a 15mm hex head - You need to use the proper grade bolts. The factory spec is "Grade 8" (SAE J429 Spec) OR "Class 10.9" (ISO R898 Spec). You're better off ordering the bolts from AMG.
12 - Inclined Cam (Nord-Lock) Lockwashers (AMG p/n 6008029)
Halfshaft Retaining Bolts:
This is the bolt that holds the halfshaft in the hub. If you overtorque the halfshaft retaining bolt (in the hub) you can stretch and damage the bolt, which will break later and cause other problems.
FYI, AMG rather recently added a special note to clean off/clean out the old Loc-Tite from the bolt threads and hole in the halfshaft before reinstalling.
The factory installed bolt and lockwasher are military part numbers (MS90728-62 & MS35338-65) for those purist among us, but a good quality SAE Grade 8 Bolt (3/8-16 X 1 1/4) CAD plated and a Medium Half-split Lockwasher (3/8" I.D.) will do along with Loc-Tite 242 (Blue). The specified bolt torque of 37 lbs.-ft. has remained the same since the original design smaller (5/16-18) bolt was replaced in the early 80's.

Upgrading to the 12.1K GVW Halfshaft
The 12.1K shaft has much larger splines going into the hub than the stock halfshaft, 32 splines vs. 27. The centershaft is considerably larger in diameter and the cv joints are much beefier as well. Realize that the existing halfshaft is the weakest link in the drivetrain. This means that the halfshaft will act as a 'fuse' and break before taking out some other expensive part like a geared hub.
For those of you that may consider upgrading your halfshafts to the 12,100 GVW shafts, here is a little bit of information that I have learned from my project of upgrading my rears:
First, you will need to buy the top gear for the 12,100 GVW hub, P/N RCSK17046 or P/N 6009453. You will also need the spacer that goes into the end of the gear and the two bearings. Now may also be a good time to replace the hub seals since you will have the hub apart anyway. Be sure not to forget to buy the spacer like I did.
The next problem will be at the brake rotor. Since the diameter of the 12.1k cv joints is so much larger than the 10.3 ones, there may be some interference between it and the brake caliper yoke. Some of the 12.1k shafts are machined a little bit smaller where the interference occurs, but most I have seen are not. If yours is not, you can either machine this area of the joint down a little (access to a good lathe is helpful), or you can remove the brake caliper and grind about 1/8 to 3/16 off of the yoke. At this point you can install your shafts and now you are ready for next offroading adventure!

