Military Antenna Conversion Vs. 2.0
Updated April 19, 2016
 This is my new and improved updated version on how to do this conversion. The intent of this conversion is to turn the antenna into a generic whip. You will have to tune the antenna to your intended frequency with your own antenna tuner or cut the whip to the right length.
I started out with an ICOM AH-2b 8' whip antenna (hooked to an autotuner) which worked great until I closed my garage door on it. The spring took a set that I couldn't fix. ICOM refused to sell me a spring. I said I'd be damned if I was going to spend 300 bucks because I needed a spring. I decided to make something that would be high quality, last and be repairable.
The ICOM antenna has a real nice thin tapered Stainless steel whip and attachment point. It allows me to stow the antenna bent over behind my truck. I have to be able to drive into my garage so the antenna can't stick up. In fact ICOM does sell replacement whips. My thinking was to adapt the ICOM whip assembly to some kind of new spring. I tried a heavy duty spring from Radio shack on the ICOM mount and that was a joke. Since I was already using a Military HMMWV antenna mount for the ICOM I started looking at surplus antennas. I found these really nice high quality MX-6707 base and AS-1729 whip military antennas that were made to fit in my existing mount. They have really heavy duty springs and are built like a tank. You can get the base for 85.00 at Fair Radio Sales. The antenna consists of four parts. The antenna, spring, top case and bottom case. The upper antenna ($15), lower antenna ($18), tie down ($8) and vehicle mount (new for $20).
Just a note. One of my readers is running stock MX6707 bases with the military green whips on 2m and 6m. He said that you can achieve a good match by turning the dial on the bottom of the base.
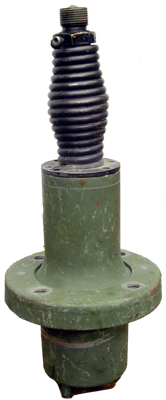 The problem was that the antenna was originally an integral part of a military radio system designed to operate between 30 and 70.5mhz and had antenna matching electronics embedded throughout the whole assembly. I wanted the antenna to operate HF between 7 and 54mhz. The combination of my ICOM whip, which has no loading coils of any kind and my SG-237 antenna tuner has served me very well up to now and I didn't want to change it. This meant that I would have to turn the military antenna base into a straight through wire up to the ICOM whip. The first thing I did was to cleanup the whole thing and take it apart.

 This is a motor driven internal matching assembly that I took out of the bottom case. I also removed all the jacks and plugs. Just cut all the wires off and pull the coils out.
The top case (upper base) shown below has a shield and a coil wrapped around a sintered iron core. You have to remove the iron core. This core is very very hard and will not drill. I used a chisel and a 1/4" masonry bit. You have to get the whole thing out. It has to be clean all way to the top plug of the case.
 Do not dig out the coil and the shield in the upper base. I learned this the hard way. Removing these weakens the case and causes it to crack under the stress of the bent over spring. I had the antenna on my truck for a year when I noticed that the case was cracked. When I took the case apart it came apart in my hands.

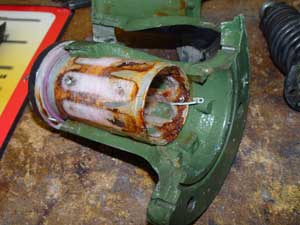
The broken upper case
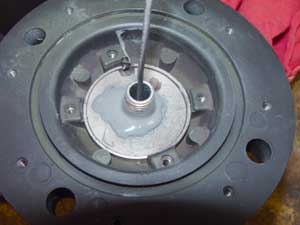 Get a 1/4" galvanized pipe nipple. Mix up some JB Weld epoxy and coat the outside of the pipe and insert it into the center hole. This will add structural strength to the case and insure that it will not flex and crack. The length of the nipple isn't critical because there is so much room underneath. I just measured the depth of the hole and added 1/2" and bought the nearest length stock nipple.
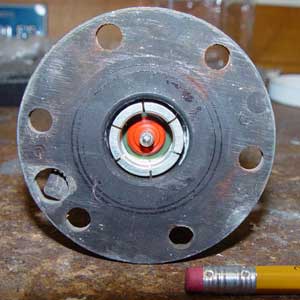
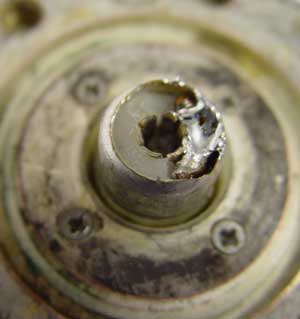 This is a picture of the top of the top case. You need to drill a 1/16" hole in the white nylon insulator that's between the inner and outer receptacle. Insert a length of #12 solid wire with the end stripped off into the pipe from the bottom and up through the hole. Then solder the wire to both the inner and outer receptacle contacts. Don't bend or leave solder in the center or on the outer portion contact surfaces of the receptacle.
Remember that the truck is the ground plane and the whole antenna assembly is the radiator. You have to make sure that this receptacle. and the bottom spring seal is intact or water will be able to enter the antenna.
Another mistake I made on my first attempt was to run the #12 wire all the way up from the bottom through a hole I drilled through the receptacle.; through another hole I drilled through the bottom of the spring; through another hole I drilled in the top of the spring to the whip. After It was all done and in service it dawned on me one day that water could enter the antenna from the top and compromise the whole case. I ended up using some silicon sealer as a quick fix but water did get in. Drain Water
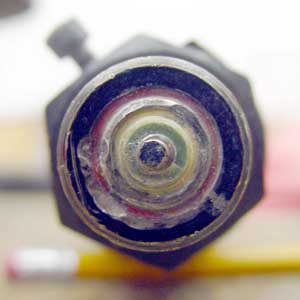
Below is a picture of the spring bottom (left) and the top (right). The military seals are tried and proven well engineered designs that I left alone to do their job.
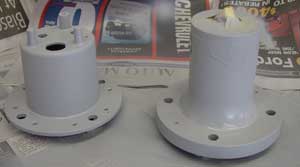 Cleanup and prime / paint all the parts.
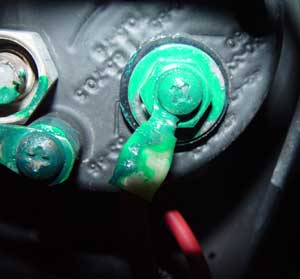 I replaced all the existing plugs back into the bottom of the case so all the holes would be closed off. I fabricated a through the case connector out of a 3/8" hex bolt. I drilled and tapped threads in the hex head as shown on the right. I inserted the bolt through the case using a black plastic insulating washer available at your hardware store. On the inside I soldered a 3/8" round terminal to the #12 wire and fastened it to the bolt.
Make sure that the coax and radio are well grounded to the vehicle. After you're done with the antenna make sure that it is completely isolated from ground. Take an ohmmeter, put one lead on a good vehicle ground and the other on the 3/8" through the case connector bolt. It should be open. If it's not fix it or you will ruin your transmitter.
Now all you have to do is connect the hot wire from the transmitter to the antenna using the through the case connector bolt. You can attach a ground to the lower case if you want but it's not necessary. Once again make sure that the through the case connector is isolated from the ground. I brushed on liquid electrical tape plastic coating to weather proof the connections.
 If you're using the stock military whip you are done. If you are adapting the Icom whip you need to do some machine work.
This is the final and probably the most difficult part because you need a machinist to thread the lower part of the ICOM whip holder to the same thread pitch as the black military antenna screw. I cut the black antenna screw off the bottom of the thick fiberglas antenna that came with the military base. The ICOM base screws into the antenna screw adapter and the adapter screws onto the top of the spring.
There may be some easier ways to adapt a whip to the antenna base. I got away with the above because my friend is a machinist.
Convert a Military MX-6707 base and an AS-1729 whip to use for CB
Follow the above instructions and modify the base.
Take the top half of the antenna and cut it down to about 38" using a tubing cutter. Check the SWR on channel 19. Trim the antenna one inch at a time until the SWR is around 1.6 to 1.7 or lower. I have an SWR of 1.5 on 19 and around 1.7 - 1.8 on 1 and 40 with a 32" antenna.

