
Installing a Detroit Locker
Reassembly Page 2
Page 1 of this Article
Remove Differential Article
Replace U-Joint Article
© Copyright 2000 - 2008 Chuck Kopelson 04/21/2005
Updated April 15, 2009
 Now it’s time to reassemble the unit. Some steps will have to be repeated a few times for test fitting purposes. Since several of the bearings are press fit, I have an extra set of new bearings that I have polished until they slide on and off much easier. This allows me to install and remove them as many times as needed in order to get all the settings and clearances within proper specs. After everything is set up properly, I disassemble the diff again and press the new bearings on.
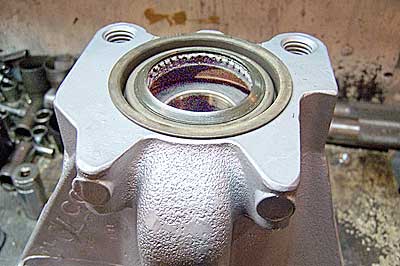
For the first test fit, I will use the original pinion bearing shim and install my modified rear pinion bearing race. I then place a modified front pinion bearing into the front of the housing and, using the old crush sleeve, install the pinion. The yoke is installed and tightened just enough to remove any slack in the bearings. It can take several attempts to get the pinion depth set right and we don’t want to destroy new bearings and seals each time.
For the final assembly, everything is as noted above except this time we will use new bearings, new crush sleeve, and a new seal.
 Installing the yoke seems like a very simple thing, but doing this wrong will guarantee premature failure of the pinion bearings. Place a little grease on the pinion where the crush sleeve goes before sliding the pinion into the housing to aid the crushing process. Tap the yoke onto the splines (lightly! Do not damage the threads) and put the pinion nut on hand tight. The next step is the hard part and it is CRITICAL to the life of the bearings that it be done correctly. It will take a CONSIDERABLE amount of torque to crush the sleeve. To do this I use a high torque air impact wrench running on 150psi+ of air pressure. Tighten the pinion nut just to the point that all slack is removed in the bearings. DO NOT overshoot. Using an in-lb beam type torque wrench, check the bearing preload by turning the pinion with it. We want the preload to be between 17 and 25 in-lb of torque. Using short bursts with the impact wrench, I will tighten and recheck the preload until I am within spec. Extra care must be taken as it is easy to exceed spec. If you overtorque here, you will need to start over with a new crush sleeve.

Here is the new Detroit locker. It is a very solid and reliable unit, and is the standard by which all other lockers are measured.
 Install the ring gear onto the locker using new ring gear bolts. Use red Loctite and torque to 95-115 lb-ft.Install the new carrier bearings at this time.
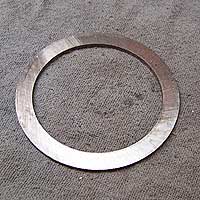
 Next take the 2 original carrier shims and place them in the housing. Use a little grease to stick them into place. The thinner one will go on the left side. As with the pinion shim, we will use the original shims as a starting point and will change sizes as required. Before attaching the spreader, I will attempt to put the carrier in the housing. This is to get an idea about the carrier bearing preload. If it goes in easily, the preload is not enough. In this case, on final assembly I will add a few thousandths larger shims to each side to tighten them up a bit. Carrier preload is not as critical as pinion bearing preload, so having a little too much is not a big deal. If in doubt, just add a little to the shim thickness. Just be sure to add the same amount to both sides so as not to disturb the ring gear backlash.
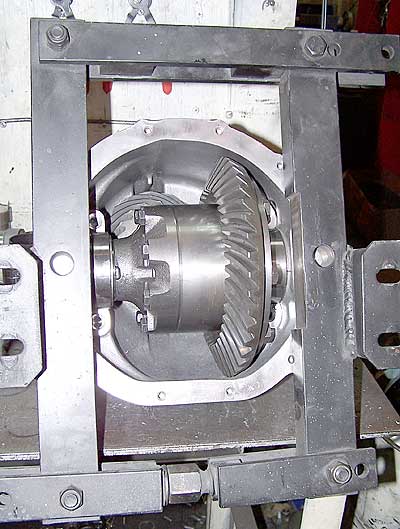
Next, I attach the case spreader and put the carrier in.
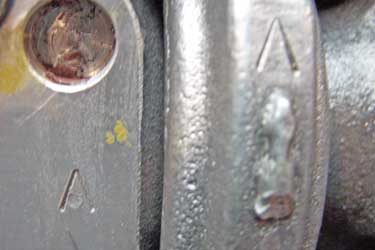

Install the bearing caps and torque to 55-70 lb-ft.Note the markings on the caps. There is an up arrow and a letter stamp that matches a corresponding stamp on the housing to denote left and right.
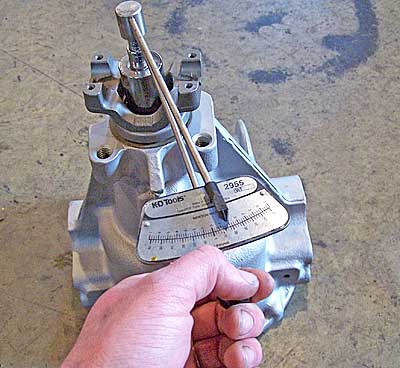
 Attach the dial indicator and with the yoke held still, rock the ring gear to check the amount of play (backlash). The backlash will need to be within proper spec (.005”-.009”) in order to get a good pattern to check the pinion depth. If the lash is too low, add to the left side and subtract an equal amount from the right. Knowing how much to change the shims comes with experience, but I would suggest moving in .002” increments to start.
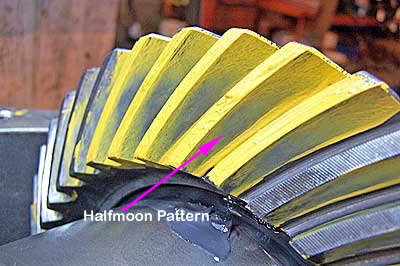 Apply gear marking compound to 2 or 3 locations around the ring gear, covering 3 or 4 teeth in each spot. Rotate the yoke several times in both directions while applying a resistance to the ring gear with your hand in order to get a good, readable pattern. While it is beyond the scope of this article to go into interpretations of all the various possible patterns
The one shown here was the initial pattern taken and indicates that the pinion depth needed to be adjusted. Note how the pattern looks like an elongated half moon (rounded toward the top of the teeth and flat toward the bottom of the teeth.) The pinion was sitting just a little too close to the centerline of the carrier. After disassembly of the differential, I used a .002” thinner pinion shim, reassembled the unit, rechecked backlash and got a good pattern.
Unfortunately, it was late in the evening and my camera battery was dead, so I was not able to get a picture of it. A proper pattern will look like a long oval shape centered between the top and bottom parts (peaks and valleys) of the ring gear teeth. Centering between the inside and outside of the teeth (outside being the outer diameter of the ring gear) is not critical and trying to get the pattern centered this way will usually just lead to frustration.
 Once all the proper clearances were set, as mentioned above, the unit gets disassembled one last time and reassembled with the new bearings instead of my modified ones. All clearances are rechecked one last time and then the cover is installed. I use Permatex Ultra-Black as the sealant. Install new bearings on the stub shafts and tap them into the housing. Install the new output seals and you are ready for the unit to go back in the truck.
